how to create blog app in android studio | website to app free
J
The easiest and easiest way to create an App from your Blogger blog is by following the clear and precise instructions found in this Blogger Tutorial . It is not something from another world nor should you have knowledge of code, are a few simple steps with which in the end you will have your own App of your Blogger blog completely free and then start distributing it to your friendships and so they will take you on your phone Smart your Blogger blog and they can access it and see your new posts.
How will this App be displayed?
- We will use a Splash screen, which is a welcome screen, it will take 10 seconds and then continue its course until you load your Blogger blog in the App
- In addition, the application will only be displayed vertically and not horizontally
- You have a menu to share your articles on your social networks
First step:
Enable the mobile template of your Blogger blog, if you don't know how, follow the instructions below
Enable the obile template of my Blogger blog
Second step:
You need to install on your Android Studio desktop computer, which is essential to create applications, follow the instructions for installing Android Studio from the following three links:
Install Android Studio
Install JDK 8
Update the SDK Manager
Third step:
Once you have installed Android Studio and JDK 8, you will be ready to insert some codes in your first Android Studio project
Explanation:
What we are going to do is create a project “An application” in Android Studio, we will copy some codes and we will insert the URL address of our Blogger blog. When loading the entire project in Android Studio it will create your application generating an APK. This APK is your mobile application, which you can install on your Smartphone that uses Android system, as well as upload it to Google Play and distribute your application for free.
When you open your application on a Smartphone, it will immediately open, and your Blogger blog will appear inside it, as long as you have a mobile template for your blog. Every time you publish an entry in your blog, it will immediately be updated in your application, because we are using the URL of your Blogger blog, with this your followers will see your news from the application you create, as long as they have Your App installed.
Note: It is recommended that you have a good optimized mobile template, so that a professional design is displayed
Video tutorial - How to create an app from my Blogger blog?
1. - Open Android Studio
2. - One click on “ Start a new Android Studio Project ”
3.- It will show you the following screen
4. - Change where it says:
Application name : Change it by the name you want to show in your application
Company Domain: Change it by your company's URL
Then you click on “ Next ”
5.- The following window will appear in which you must select “ API 16: Android 4.1 (Jelly Bean) ” and click on Next
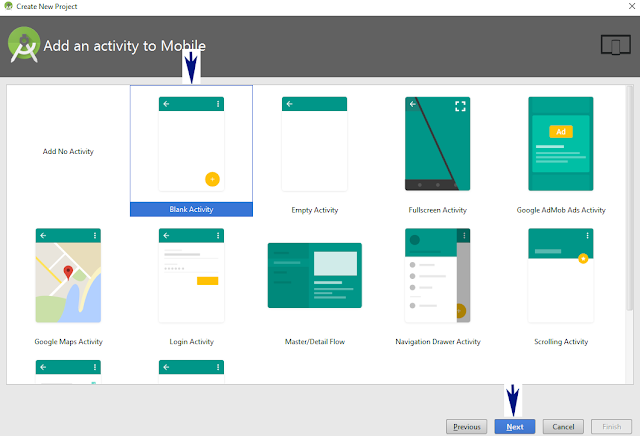
6. - Now a new window will appear, choose “ Blank Activity ”, then click on Next
😋
7. - A new window will appear, you just have to click on the button that says Finish
Ready, you are creating your first project, wait a few minutes
8. - It will show us the following on the left side, look at the following image
9.- Please deploy the project as follows, look at the image
10. - A click on AndroidManifest.xml will show you the following
11. - We will remove a part of the code, look at the following image
12.- Copy the following code as I show it in the following image
Insert the following code:
< uses-permission android : name ="android.permission.INTERNET" /> < uses-permission android : name ="android.permission.VIBRATE" /> < application android : allowBackup = "true" android : icon = "@mipmap / ic_launcher " android : label = " @ string / app_name " android : theme = " @android: style / Theme.Holo.Light " > < activity android : name = " .MainActivity " android :screenOrientation ="portrait" android: label = "@ string / app_name" > < intent-filter > < action android : name = "android.intent.action.MAIN" /> < category android : name = "android.intent.category.DEFAULT"/> < / intent-filter > </ activity > < activity android : name = ".Splash" android : label = "@ string / app_name" > <intent-filter > < action android : name = "android.intent.action.MAIN" /> < category android : name ="android.intent.category.LAUNCHER" /> </ intent-filter > </ activity > </ application > </ manifest > |
13 .- We create a new Java class, with the name MyAppWebViewClient , look at the following image
14. - We delete a part of the code that generated us, I have inserted a new code
Insert the following code:
import android.content.Intent; |
Make this change:
Remove the URL that says helpdeblogger.comand replace it with the URL of your Blogger blog for example:
example.blogspot.com
15. - We are going to create a new Java class with the name of Splash , look at the following image
16.- Remove a part of the code and replace it with a new one, look at the following image
Insert the following code:
import android.annotation.SuppressLint ; |
17.- We click on MainActivity , it will show us the following
18.- We have to delete part of the code, and replace it with another one as I show it in the following image
Insert the following code:
import android.app.ActionBar; |
Make these changes:
Remove the URL that says helpdeblogger.comand replace it with the URL of your Blogger blog, for example
example.blogspot.com
Similarly there is another URL that is marked yellow helpdeblogger.com delete it and enter your web address
Also change the names that are marked yellow and say Widgets and Plugins for Blogger , enter a new phrase
19. - A click on Activity_main.xml will show you the following
20.- Remove all the code found, and replace it with another code, look at the following image
Insert the following code:
< LinearLayout xmlns: android = "http://schemas.android.com/apk/res/android" |
21 .- Create an activity_splash look at the following image
22. - One click on activity_splash and it will show us the following code, look at the image
23.- We remove all the code that is found and replace it with another one, look at the following image
Insert the following code:
< RelativeLayout xmlns: android = "http://schemas.android.com/apk/res/android" |
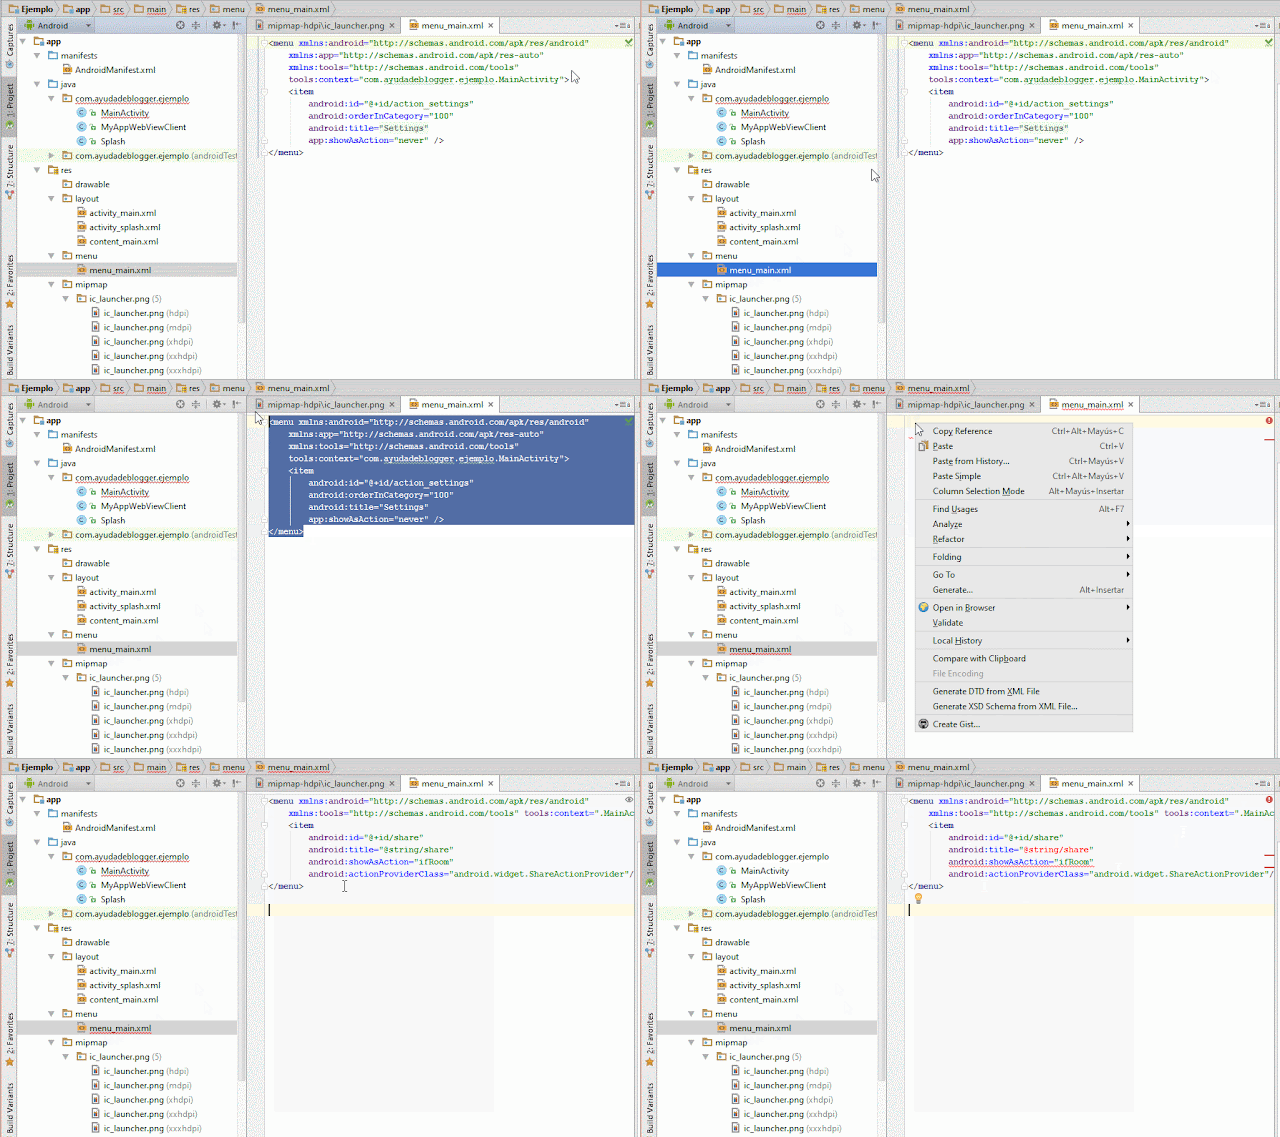
24.- A click on menu_main.xml , will show us the following code, look at the following image
25. - Remove all the code found and replace it with another code, look at the following image
Insert the following code:
< menu xmlns: android = "http://schemas.android.com/apk/res/android" |
26.- Open strings.xml , it will show you the following, look at the image
27. - Remove all the code found and replace it with another code
Insert the following code :
< resources > |
28.- Now we need to insert a welcome image, to perform this trick follow the instructions below.
First create a welcome image that has a dimension of 701x927 and save it with the following name:
app_ayudadeblogger
For example this is the welcome image of my app
Once created, follow the instructions below:
Look at the sequence of the following image
Remember to perform this process of copying the welcome image within the 5 points that I leave pointing
29.- We have finished part of the configuration, we are ready to save our app and this will generate our APK, which will help us to show it on our smartphone
Follow the instructions below.
1 Click on “ Build ” then on “ Generate signed APK ”
2 Follow the instructions in the following video tutorial
Note : remember to wait a few minutes until the APK generated
Its APK is the one with the name:
App-release.apk
Remember that you can change your name by always keeping the .apk
That's it, now distribute your new App with all your friends, you can upload the file to drive.google.com and share with the general public
View from a smartphone to Install APK
- You can download the application and see how it works, from the following link
For the followers of Ayudadeblogger.com
If you have not been able to perform this great trick on how to create an App of your Blogger blog, you can leave me a comment in this post, requesting that I help you create your App, I will gladly help you and send you the download link of your Blogger app within your comment in this post.
Instructions to create your app
First : You must leave a comment in this post requesting that you make the app of your Blogger blog and indicate that you have already sent that request
Second : Send the request to the following email address: Shakilovi02@gmail.com
Instructions to create your app
First : You must leave a comment in this post requesting that you make the app of your Blogger blog and indicate that you have already sent that request
Second : Send the request to the following email address: Shakilovi02@gmail.com
Facebook Id: facebook.com/mr.shakil.ovi
Attach the following information:
- URL of your Blogger blog or your website
- Attach a cover image of your Blogger blog that has a size of 701x927 pixels - Indicate the name with which you want your app to be displayed, for example " Cars "
Attach the following information:
- URL of your Blogger blog or your website
- Attach a cover image of your Blogger blog that has a size of 701x927 pixels - Indicate the name with which you want your app to be displayed, for example " Cars "
That's it ..................
Any questions do not hesitate to write
regards


Nice blog and absolutely useful to everyone. You can do something much better but i still say this perfect. Keep on sharing for such a great stuff. Android Development
ReplyDeleteIncredibly conventional blog and articles.Directly I am found which I truly need. please visit our website for more information about Flutter App Development Services in Delaware
ReplyDelete